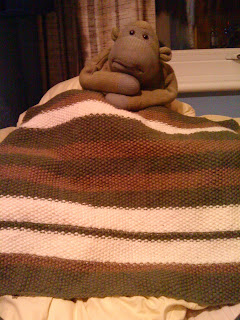
My friends Gratsia and Marco have recently moved into a new flat. The window in the front of the house has a deep inside ledge which Gratsia wanted to use to sit on, and look out of the window, but being wooden and hard would make this difficult. She requested me to make a throw to so that sitting there would be more comfortable, and this is what I came up with! Made from chunky yarn in colours to match her cushions this throw is knitted using Seed or Moss stitch, and took a while! I'm very pleased with it, although I am yet to deliver it to her!
The cushion that the throw is made to match...
The throw in its glory!
Monkey posing!
Tuesday, 7 October 2008
Tuesday, 12 August 2008
Sainsbury's Organic Jute Bag Make-over - Sewing
I had a dilemma. My beloved Sainsbury's Organic Jute bag, which I bought a year and a half ago, have used almost every day since to carry shopping, knitting, books, all my precious possessions... Well, all that love and use had taken it's toll. The lining was peeling away slowly, leaving large bald patches inside...
... As well as a big ol' hole in the side. I could no longer use it for everyday stuff in the condition it was in, but I hated condemning it to solitary storage of yarns in my bedroom, since it was the perfect size for transporting larger knitting projects around with me. I resolved to fix it...
Whilst on Family holiday (*groans*) in Wareham, Dorset last week I passed a fabric shop with some large patches of fabric for £2 each. I bought three patches, measuring about 30" square of a lovely rose-covered fabric, thick linen or cotton, which I thought would be appropriate.
Last night I got out my trusty Brother's sewing machine and set to work. The two panels measure about 12"x15", bottom gusset about 6"x15", and two side gussets about 6"x12". Having sewn the lining panels together I sewed the top of the lining to the inside of the jute bag. I then made a small heart-shaped patch out of remaining material and hand-sewed it to cover the big ol' hole, attaching it a little bit to the inside lining to give it a bit of anchorage. The whole operation took about three hours.
The bag is now better than new, and the lining is so nice I think it is now reversible!!! Talk about "Good for the environment", you can make it even better by giving it a make-over instead of throwing it away when it get a bit tatty, and immediately you have a unique bag you cannot get at the supermarket!!!
Labels:
Bag,
Brother sewing machine,
Dorset,
Environment,
Fabric,
Jute,
Organic,
Sainsbury's,
Sewing,
Wareham
Little Socks - Knitting
I had a quest: to make kilt hose for my (now ex-)boyfriend. I didn't have time to finish them for his birthday.
The pattern which he found required the hose to be made on circular needles, so I made a trip to Stash in Putney, a luxury yarn shop, for some wool and the necessary needles. This was where I was introduced to Ravelry!
I thought I ought to practice making socks on circular needles, and found a pattern at Mind's Eye Yarns . So that I wouldn't get too confused I made one sock at a time, and made little baby ones so that I wouldn't spend too much time on them. The pattern is easy to follow, and the socks simple to make and nice when finished. The two prototypes now form part of the birthday present, on a toy giant anteater.
I used some blue acrylic DK I had lying around for the prototypes, and they look quite nice now, what do you think?!
Banana Cosy - Knitting
A very silly project but also a lot of fun! When visiting Stash, a yarn shop in Putney, I picked up a postcard with a pattern for a banana cosy, from a pile of postcard on the desk. It was an advertisement for "The Rebel Knitter's Guide" to be published in The Guardian that Saturday, which I duly bought. The Monday after the guide was published I started and finished it!
It's simply stocking stitch to the length of a typical banana, with a bit of increasing at one end to get a tapered shape, and a few YOs at the other end to thread a ribbon (or, in my case, an icord) through. Check out the pattern on Ravelry!
I got a lot of funny looks from people watching me knit it in public, I think the shape of the item was suggestive! ;o) My cosy is constructed from yellow acrylic yarn, left over from Tom's Watford United scarf (see earlier posting). The guide I've kept, and the post card I've given to my grandmother, who is planning to make cosies to sell to raise money for a charity "Containers of Hope", who fill boxes with useful items to send to places of conflict/famine/natural disastors etc..
Monday, 11 August 2008
Little Bags - Crochet
I've made quite a few of these as they're really easy to make. You just chose the width to cast on, crochet until it's twice the length you want it to be, and sew up two sides, and you have a bag! Tassles are nice on the bottom, and you can make a strap using icord or other weaving techniques such a plaiting or ones that you may have used when you were little to make the friendship bracelets that your friends never wore :(
You only really need one 50g ball of yarn, and I've used different funky yarns (fuzzy ones, metallic ones, bobbly ones) for different effects. Hopefully I'll get photos of my other creations up here eventually, and I hope I'll get to sell them one day too! The one pictured is the one I use to carry my mobile and/or iPod with me around the house when I'm wearing clothes without pockets.
Tam o' Shanter - Crochet
Another gift for my ex-boyfriend, wasn't he lucky! Here's it's worn by me... Hideous!
*Ahem* Problem is, I don't have a clue how I made this. I just made it up as a went along, and if it was going a funny shape I'd just undo it and start again. That's the beauty of crochet as opposed to knitting, because you can't just undo a bit of knitting up to a certain point before it went wrong, it doesn't work that way! Because you're never having to hold stitches when you crochet, it's already binding itself off as you're making it, you can create and correct to your heart's content! However, you do not get the variety of stitches and shaping that you get with knitting, so I love both arts! :)
Watford United football scarf - Crochet
This was a birthday gift for my good friend Tom who supports Watford United Football club and had always wanted a supporters' scarf! It's crocheted in doubles, acrylic yarn (for easy washing, you know what boys are like!) in the club's colours. Making a crochet scarf like this is very easy, you just cast on (or whatever the equivalent is in crochet, I don't know) until you reach the width you want the scarf to be, and then crochet away! I've made several scarfs in this way, one in Gordon clan colours to match one of my friend's kilts (see below), one in "Magpie" colours for an ex who loved magpies, and one for myself to match my uniform where I used to work, to name a few!
Subscribe to:
Posts (Atom)